Hardwood Flooring: Sanding and Oiling
Welcome back! Ready to talk more hardwood flooring? Good, because there’s lots more flooring stuff going on in the Young Victorian we’ve dubbed Annabelle’s Place. In our last flooring post, we had just finished installing all of the upstairs wood flooring and were excited (may not be the right word) to get going on finishing the floor.
First step? Prep the raw wood for sanding. We went around and filled some of the larger wood knots in the floor with a wood filler. Remember that the flooring we chose was a rustic, full-of-character wood that did have some imperfections. Consequently, there were spots here and there that needed to be filled and smoothed. Otherwise, we’d end up with a lot of sock-snaggers and that would not be fun. Way back in a much earlier post, I shared our decision process on why we picked the wood and finish that we did (catch up here).

Sanding…Definitely The Messiest Step
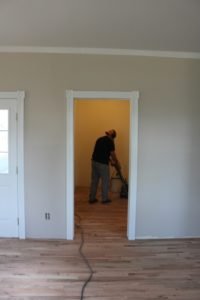
So gotta be honest, I’m a little disappointed that we didn’t get a few more pictures of the sanding process. I would have especially loved sharing a video of what an orbital floor sander can do to a 200 pound-plus man on his first attempt to use said sander. You’ll just have to take my word for it but it was part shocking and part hysterical to watch Warren get whipped around the room that first time he fired up the sander. He quickly got the upper hand but man, I wish my phone had been on the ready!

Not All Sanders Are Created Equal
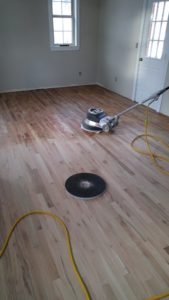
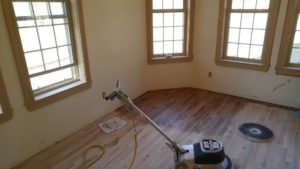
We had to rent two machines to get the finishing project done. We first rented a drum sander to go over the surface several times, changing to a finer grit of sand paper each time. And this can be a funky process because you are definitely at the mercy of the sander you rent. Not all are created equal and if the sander you rent is at all the least bit wonky, you will get some wonky-ness on your floor too. Warren was really diligent about the speed of his passes over the surface. He had done an extensive amount of research and knew consistency was key. Even with Warren’s diligence though, there was some definite wonky goin’ on! But lucky for us, even in those less than perfect spots, we were okay because we weren’t going for the look of pristine hardwoods. We wanted the floors to look timeworn and more on the rustic side so wonky fit the bill!
We rented the first sander for 24 hours, sanded the rooms we were working on, and then returned the sander the next day. During that same trip, we would pick-up the orbital sander we needed to make our final sanding passes and apply the oil. We bought sanding screens for the orbital along with the scrubby pads (I’m sure they’re technically called something else) that we would use to apply the oil finish. We also used the scrubby pads to buff the floor for the final finish.
Oiling…Definitely The Easiest Step!
The coolest thing about finishing the floors was that we were able to sand and finish all of the upstairs rooms in just 2 days! It was awesome and only possible because we used Monocoat oil for our finish. That oil went down so quickly and was ready to walk on 24 hours following the application. If we had gone the traditional route of staining and applying polyurethane, it would have taken so many more steps in the process and the process would have taken much longer. We would have had to leave the house for a period of time during staining and finish or endured the fumes, which either way would have not been good.

We Really, Really Love Oiled Floors!
I could go on and on about how much we love our oiled floors. Easy peasy and no stinky application (zero % stinky VOC). And it was really easy to pick our color for the oil (they have like 30 colors) because we were able to order samples and try them on some of our flooring pieces. We ended up going with a dark brown (Castle Brown) because it toned-down the red in the oak.
And let’s just talk about how easily this stuff goes down. You only apply one coat! Yep, just one coat! So I would squeeze out an amount of oil onto a section of flooring and Warren would go over it for a first pass to spread the oil out over the wood. I’d pull off that first pad and Warren would attach a second pad to work the oil into the wood. The wood only accepts so much oil so we’d then go over it a third time with a small towel under the sander pad to remove the last of the excess oil. And that’s it!!! So with one 24 hour rental of the orbital sander, we got the final sanding done and the oil applied! Could not have been easier.

Biggest “Instant” Transformation Yet
Just 24 hours later and our floors were done! It was a quick and amazing transformation and I’m so happy we found that oil online. It was an incredible time-saver and we love the look of our floors. They’re easy to care for and they look exactly like what we’d hoped for when we first envisioned a rustic and timeworn look.

So that’s the process and with that, we had all of the upstairs flooring finished within just a couple of days! If anyone out there is getting ready to have hardwoods installed, please visit the Monocoat website or ask any question below about how we used it. We cannot recommend this product any more highly! Thanks for reading; I think we’ll talk a little backstory on Annabelle’s Place next time, so be sure to watch for that!
{Shelley}
P.S. **Disclaimer** We are not hardwood flooring installation experts. Please be sure to do your own research before attempting installation on your own or hire professionals! We also have no affiliation with Monocoat and were not compensated in any way for this “review” of their product (although that would have been lovely); we just love the product!